viernes, 29 de enero de 2016

Un clutch muy British

Aquí estoy con mi clutch de estilo británico. Recientemente encontré esta tela llena de Vespas que había comprado hace ya bastante. Aunque la compré porque me enamoré de su diseño, no la había usado antes porque no sabía qué hacer con ella. Supongo que es algo que me pasa de vez en cuando, compro telas que me encantan cuando las veo en la tienda pero que luego no sé qué hacer con ellas. Por suerte encontré algo que hacer con esta, un clutch diseño de Michelle Patterns.
***
Here am I with my Brit Style clutch. Recently, I found this fabric full of Vespa motorcycles I had bought quite a long time ago. Even if I bought it because I loved the design I haven't used it before because I didn't really know what to use it for. It's something that happens to me every now and then, I buy fabrics that love when I see them at the shop but don't really know what to do with them afterwards. Luckily, I thought of something for this one, a clutch designed by Michelle Patterns.


¿Te imaginas con unos vaqueros, una sencilla camisa blanca,  unas manoletinas rojas, tu clutch y saliendo a tomar algo? Yo sí, oh sí, sí!!! Bueno, ahora me tengo que ir a trabajar pero puede que sea el plan para mañana.
***
Can you imagine yourself with blue jeans, a simple white shirt, a pair of red flat shoes, your clutch and getting out to have a drink? I do, oh yes I do!!! Well, I have to go to work now but it might be my plan tomorrow.


¡Feliz San Viernes!
***
Hope you all have a great Friday!!!

jueves, 21 de enero de 2016

El shopping bag Country Kitty de... Maru

En marzo de 2015, Country Kitty publicó un tutorial donde explicaba como hacer esta preciosa shopping bag. Tan pronto como publicó el tutorial me hice uno, como podéis ver en este enlace. Resultó ser muy útil porque es grande y muy ligera, así que la usé un montón hasta el final del verano. En el trabajo todo el mundo me dijo que le encantaba y mi jefa, Maru, me pidió una. Hoy me gustaría compartir con vosotr@s la que hice para ella.
***
In March 2015, Country Kitty published a tutorial where she explained how to make this gorgeous shopping bag. As soon as she published the tutorial I made one for myself, as you can see at this link. I found it very useful, because it's quite big and very light, so I used it quite a lot until the end of the summer. Everyone at work told me they loved it and my boss, Maru, asked me for one. Today I would like to share with all of you the one I made for her.


La suya es una versión más pequeña ya que no quería una tan grande. ¿No os parece adorable? Si os gusta podéis conseguir el tutorial gratuito en la web de Country Kitty y empezar ya a haceros una para la próxima primavera. Veréis que es muy fácil de hacer, no tardaréis más de una tarde. Espero ver muchas por la web esfera.
***
Hers is a smaller version since she didn't want a big one. Don't you think that it's very cute? If you like it you can get the free tutorial at Country Kitty's web and start making one already for next Spring. You'll find that it's very easy to make, it won't take you more than an afternoon. Hope to see many around the web sphere.

¡Feliz Jueves!
***
Hope you all have a great Thursday!!!

sábado, 16 de enero de 2016

My BOBO

Bueno, la Navidad ha pasado y ya he tenido el tiempo suficiente para recoger la casa después de las vacaciones, además de descansar un poco. Así que siguiendo mis propósitos de Año Nuevo, aquí estoy con una nueva entrada. Esta vez me gustaría compartir con tod@s el Bobo que hice siguiendo una idea de Marta Recio, la sobrina de mi amiga. Vio uno similar en la web y le pidió a su tía, mi amiga Mª José,  que le hiciera uno parecido. Le dio todas las instrucciones de cómo quería el Bobo: tamaño, color, puntos, broche a usar; bueno, cada uno de los detalles necesarios para conseguir el resultado que tenía en mente.
***
Well, Xmas is gone and I've had enough time to arrange the house after the holidays, and rest a little bit. So following my New Year's proposals here I am with a new post. This time I would like to share with all of you the Bobo I made following the idea of Marta Recio, my friend's niece. She saw a similar one on the web and asked her aunty, my friend Mª José, to make a similar one for her. She gave her all the instructions of how she wanted the Bobo: size, color, knitting points, closing brooch. Well, every single detail to get what she has in mind.


Aún recuerdo cuando Mª José me contó cómo sus compañeras de clase de patchwork se volvieron completamente locas por hacerse uno, o quizá debería decir uno de cada color. No me extraña que lo adoren. Creo que es maravilloso y muy fácil de hacer. ¿No os encanta su simplicidad? Como dicen "menos es más".
***
I still remember Mª José telling me how all her classmates from patchwork became completely nuts about making one, or should I say one of each color, for themselves. No wonder they love it. I think it's really gorgeous, and very easy to make. Don't you love its simplicity?? As they say "less is more".

¡Feliz fin de semana!
***
Hope you all have a great week-end!!!


jueves, 31 de diciembre de 2015

¡Feliz 2016!..... y tutorial corona estrella

Querid@s lector@s, me gustaría aprovechar esta oportunidad para daros las gracias por estar ahí durante el 2015 aunque yo no haya tenido demasiado tiempo para vosotr@s. Espero seguir viendoos por aquí a lo largo de 2016.
***
Dear readers, I would like to take this opportunity to thank you for being there during 2015 even though I haven't had enough time for you. Hope to see all around here along 2016.


Espero que os haya gustado la corona de estrella que he hecho esta mañana especialmente para vosotr@s. A continuación os dejo el paso a paso que os he preparado por si os animáis a hacer una.
***
I hope you liked the star wreath I have made this morning specially for all of you. Following you can find the step by step tutorial I have prepared in case you decide to make one.


1. Necesitaréis ramas de árbol, esponja de floristería, alambre de floristería, film trasparente, ramas de pino y acebo o unas ramitas con bolitas o bolitas de Navidad, para adornar.
2. Montar la estrella y la cruz central sobre la que se enganchará la esponja.
3. Unir las ramas según la foto con el alambre de floristería.
4. Cortar la esponja de floristería a una medida que se adapte al tamaño de la estrella, empaparla en agua y forrar con el film transparente para que no pierda el agua.
5. Con el alambre de floristería sujetar las esponja a la estructura central en X de la estrella.
6. Empezar clavando las ramas de pino de los lados de los picos de la estrella y, poco a poco, ir rellenando por el lateral de la esponja dependiendo del tamaño de las ramas de pino para que no pierda la forma de estrella.
7. Cortar trozos pequeños de las ramas de pino y clavar por la parte superior de la esponja hasta cubrirla toda.
8. Una vez cubierta completamente y formada la estrella se puede decorar con ramitas de acebo, con bolitas de Navidad o con cualquier otra planta con bolitas que pueda clavarse en la esponja.
***
1. You will need tree branches, floral foam, air plant wire, cling film, pine branches and holly flower or any plant with decorative balls or flowers, or small Christmas tree balls.
2. Put together the star and the central cross which will hold the floral foam.
3. Join the branches as in the picture using an air plant wire.
4. Cut the floral foam to the right size for the star, drown it in water and cover it with the cling film so it doesn't drop any water.
5. Attach the floral foam to the star's cross with the air plant wire.
6. Now you can start punching the pine branches to the floral foam. Start with the long ones as shown in the picture. Make sure you don't loose the star shape.
7. Cut small pieces of the pine branches to cover the stop of the floral foam, until you totally cover it.
8. Once you have covered the floral foam keeping the star shape, you can start decoring the wreath with the holly, or whatever you have chosen for the decoration.

¡Feliz 2016!
***
Happy 2016!!!

jueves, 24 de diciembre de 2015

Feliz Navidad

Aunque este año, por desgracia, no he podido dedicaros todo el tiempo que me hubiera gustado, aquí estoy, aprovechando las vacaciones de Navidad para relajarme y desearos unas felices fiestas. Me gustaría aprovechar esta entrada no solo para felicitaros, sino también para pediros disculpas por haberos tenido abandonad@s. Este año ha sido estresante en el trabajo y cuando llegaba a casa solo lograba sacar tiempo para mi hijo y poco más. Como bien sabéis me encanta coser y hasta eso he tenido que dejar un poco abandonado. Pero bueno, no todo van a ser quejas... El año se acaba y esperemos que el inicio de 2016 sea más relajado y me permita dedicar más tiempo a la costura y, por supuesto, a compartir mis trabajos con tod@ vosotr@s a través del blog, facebook, etc.. (ya son tantos medios que he perdido la cuenta).


Bueno, voy a intentar no enrrollarme mucho más, pero sí me gustaría aprovechar la ocasión para dar las gracias a todas las personas que se han puesto en contacto conmigo para preguntarme si estaba bien porque les había llamado la atención que tuviera el blog tan abandonado. A ellas y a tod@s os doy las GRACIAS y os deseo lo mejor para 2016.


¡Feliz Navidad!

viernes, 30 de octubre de 2015

El individual de Cristina

Todavía recuerdo el día que Cristina, una amiga del trabajo, me preguntó si le enseñaba a hacer patchwork. Me puse muy contenta al descubrir que le gustaban mis proyectos y que me quería como profesora, era mi primera alumna. Como ella sabía pintar broches de muñecas de madera y yo siempre quise aprender a pintarlos, le dije que podíamos compartir conocimientos y enseñarnos la una a la otra, así que eso hemos estado haciendo desde hace unos meses.
***
I still remember the day Cristina, a friend from work, asked me to teach her how to make patchwork. I was really happy when I found out she liked my projects and she wanted me as a teacher, she was my first pupil. Since she knew how to paint wooden brooch dolls and I had always wanted to learn, I told her that we could share our knowledge and teach each other, so that's what we've been doing for a few months now.


Hoy me gustaría compartir con tod@s vosotr@s el primer proyecto que ha terminado. Un mantel individual de lo más adorable, que ha hecho todito a mano y que además está muy bien hecho. ¿No os encanta? A mí sí.
***
Today I've like to share with all of you her first finished project. A really nice and lovely place mat which she has done all by hand and which is very well done. Don't you love it? I do.


¡Feliz San Viernes y mejor fin de semana!
***
Hope you have a great Friday and even a better weekend!!!

viernes, 18 de septiembre de 2015

Bolso Puzzle Estrellas de... Francesca Ogliari

¡Hace tanto de mi última entrada! Admito que las altas temperaturas me afectan de manera horrible y que no me apetece hacer nada más que tumbarme en el sofá y ver la tele (supongo que es lo que tiene ser del norte). Las temperaturas han bajado por fin, así que ya puedo empezar con la rutina. Aunque no me haya apetecido darle a la aguja ni al teclado, os he echado de menos a vosotr@s y a vuestros bonitos comentarios, por lo que estoy realmente feliz de estar de vuelta.
***
It's been a long time since my last post!!! I must admit that high temperatures are awful for me, since I don't feel like doing anything but lying on the sofa and watching TV (I guess it's part of being from the north). Temperatures have, finally, come down so I can start my routine. Even though I didn't feel like making any patchwork or computer work, I've missed you and your kind comments a lot, so I'm really happy to be back.


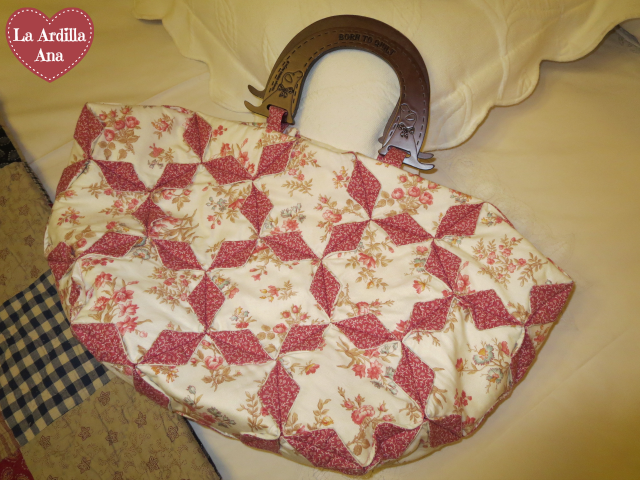
Hoy comparto con vosotr@s el bolso que hice con Francesca Ogliari, de Shabby Home, en su última visita a La Tertulia del Patch en Madrid. Es un diseño de su último libro, De Vuelta a Casa. Fui al curso con mis amigas Mª José y Rocío y, como siempre, nos los pasamos fenomenal con Francesca. Es muy dulce y una profesora increíblemente paciente, si todavía no has hecho un curso con ella te recomiendo que lo apuntes en tu lista de deseos, ¡merece la pena! Aquell@s que llevéis ya un tiempo siguiendo mi blog sabréis que yo soy superfan del trabajo de Francesca, supongo que su estilo y el mío son similares y que eso ayuda, así que intento ir a todos los que puedo.
***
Today I'm sharing with you the handbag a made with Francesca Ogliari, from Shabby Home, on her last visit to La Tertulia del Patch in Madrid. It's a design from her last book, Back Home. I went to the course with my friends Mª José and Rocío and, as usual, we had a great time with Francesca. She's really sweet and an incredibly patient teacher, if you haven't taken a course with her yet I recommend you to write it down in your wish list, it's really worth it!! Those of you who have been following my blog for a while will know I'm a great fan of Francesca's work, I guess her style it's quite similar to mine so that makes things easier, so I try to take as many of her courses as I can.


Me costó un poco pero terminé el bolso y me encanta el resultado final, aunque no estoy segura de si volvería a hacer otro (quizá cuando se me olvide lo duro que fue en algunos momentos). ¿Os gusta? Por favor, decidme que sí que me costó mucho coser tanta capa, en algún momento pensé que me cargaba la máquina de coser, jejeje.
***
It took my a while to finish the handbag but I love the final result, though I'm not sure I would repeat it (may be when I forget how hard it got at some points). Do you like it? Please, tell me you do because it was quite hard to sew so many layers together, at some points I thought I would destroy my sewing machine, LOL.


¡Feliz San Viernes!
***
Hope you all have a great Friday!!!

Related Posts...